> ## Documentation Index
> Fetch the complete documentation index at: https://cloud.laravel.com/docs/llms.txt
> Use this file to discover all available pages before exploring further.
# Laravel Object Storage
> S3-compatible object storage buckets
Powered by [Cloudflare R2](https://www.cloudflare.com/developer-platform/products/r2/)
## Introduction
Laravel Cloud allows you to create S3-compatible object storage buckets and attach them to your application's environments directly from the Laravel Cloud dashboard. Laravel Cloud Object Storage is offered in partnership with Cloudflare R2.
Laravel Cloud Object Storage may be used as an S3-compatible file storage backend for your application. Laravel applications can interact with the bucket via Laravel's [`Storage` facade](https://laravel.com/docs/filesystem), and Symfony applications may use any S3-compatible storage integration.
## Laravel prerequisites
Before utilizing Laravel Object Storage, you should ensure your application includes the `league/flysystem-aws-s3-v3` package in its `composer.json` dependencies:
```shell theme={null}
composer require league/flysystem-aws-s3-v3 "^3.0" --with-all-dependencies
```
## Creating buckets
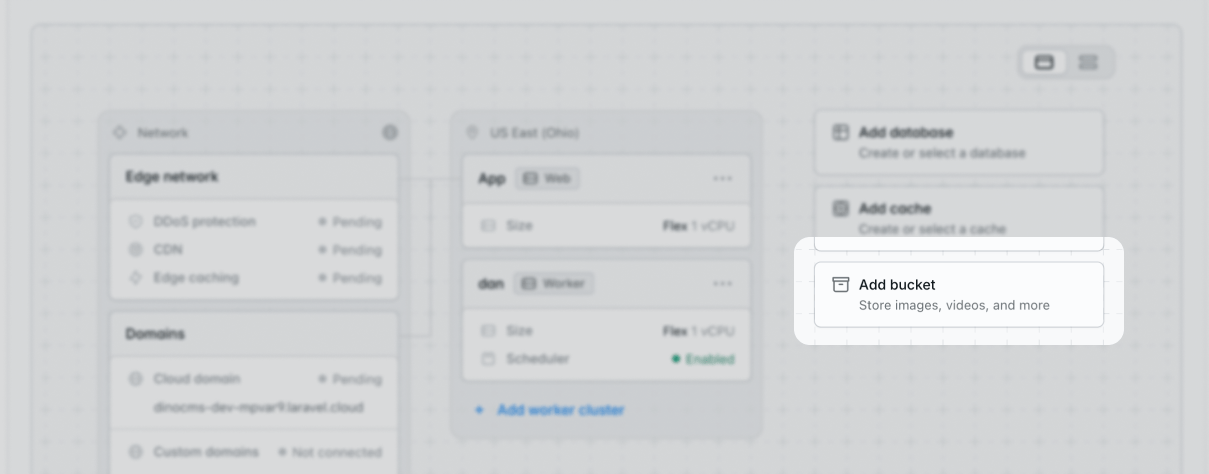 To attach a Laravel Object Storage bucket to an environment, click "Add bucket" on your environment's infrastructure canvas dashboard. When adding a bucket to an environment, Laravel Cloud will prompt you to select the bucket you would like to attach to the environment or to create a new bucket.
When creating a new bucket, select "Laravel Object Storage" as your bucket type.
Once the bucket has been attached to an environment, you will need to re-deploy the environment in order for the changes to take effect.
Visit the [pricing](/docs/pricing#laravel-object-storage) docs for information on compute and storage prices.
### Bucket disk names
When creating a bucket, you will also be prompted to provide a "disk name". This name corresponds to the name you will use when accessing the bucket / disk via Laravel's `Storage` facade:
```php theme={null}
return Storage::disk('r2')->get('photo.jpg');
```
You will also be able to indicate if the disk should be the "default" disk for the Laravel application. When a bucket is the default disk, you do not need to provide its name when accessing it via Laravel's `Storage` facade:
```php theme={null}
return Storage::get('photo.jpg');
```
### Bucket file visibility
When creating a bucket, you will be prompted to select the bucket's file visibility. All files added to the bucket will receive the specified visibility, and Laravel Cloud Object Storage buckets do not support mixing file visibility settings within a single bucket.
* **Private buckets:** all files within the bucket are private and are not publicly accessible via the Internet. However, temporary public URLs may be generated to files within these buckets using the `Storage::temporaryUrl` method [offered by Laravel](https://laravel.com/docs/filesystem#temporary-urls). These buckets are typically used for private assets like personal documents uploaded by your application's users.
* **Public buckets:** all files within the bucket are public and are publicly accessible via the Internet via a Laravel Cloud provided URL. These buckets are typically used for publicly viewable assets like user avatars.
Cloudflare R2 manages visibility at the bucket level and does not support per-object ACL headers. Do not set `visibility: 'public'` in your Flysystem storage configuration; R2 will reject the request with a `NotImplemented` error. Bucket-level visibility, set when the bucket is created, governs object access.
### Restricted file types
Laravel Object Storage buckets do not accept `.html` or `.htm` files. Any `.html` or `.htm` file uploaded to a bucket is deleted automatically. If your application needs to store `.html` files, [contact support](/docs/support) to request an exception.
### CORS policy
Laravel Cloud automatically manages CORS (Cross-Origin Resource Sharing) policies for your object storage buckets to ensure browsers will permit cross-origin requests.
#### Automatic domain inclusion
When you attach a bucket to an environment, all of the environment's custom and Cloud domains are automatically included in the bucket's CORS policy. This happens automatically without any configuration required on your part.
#### Custom allowed origins
In addition to your environment's domains, you may specify additional origins that should be allowed to access your bucket. This is particularly useful for:
* Local development environments (e.g., `http://example.test`)
* External domains that need access to your bucket
* Testing from non-production environments
To add custom allowed origins:
1. Navigate to your organization's resources page by clicking **Org > Resources > Object storage** from the main dashboard.
2. Click the "**...**" menu next to the bucket you want to configure.
3. Select "**Edit settings**".
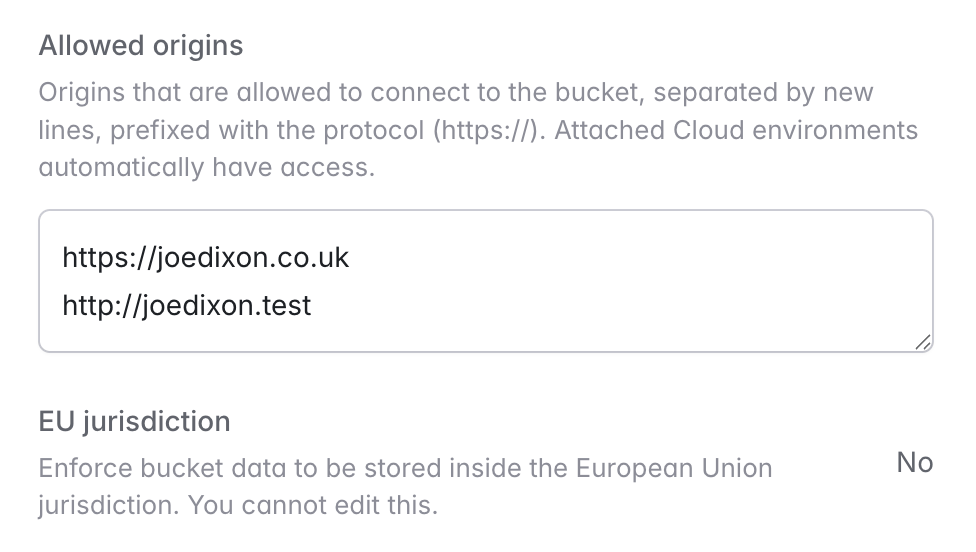
4. In the "**Allowed origins**" field (only visible for public buckets), enter the origins you want to allow, separated by new lines.
5. Each origin must be prefixed with the protocol (`https://` or `http://`).
To attach a Laravel Object Storage bucket to an environment, click "Add bucket" on your environment's infrastructure canvas dashboard. When adding a bucket to an environment, Laravel Cloud will prompt you to select the bucket you would like to attach to the environment or to create a new bucket.
When creating a new bucket, select "Laravel Object Storage" as your bucket type.
Once the bucket has been attached to an environment, you will need to re-deploy the environment in order for the changes to take effect.
Visit the [pricing](/docs/pricing#laravel-object-storage) docs for information on compute and storage prices.
### Bucket disk names
When creating a bucket, you will also be prompted to provide a "disk name". This name corresponds to the name you will use when accessing the bucket / disk via Laravel's `Storage` facade:
```php theme={null}
return Storage::disk('r2')->get('photo.jpg');
```
You will also be able to indicate if the disk should be the "default" disk for the Laravel application. When a bucket is the default disk, you do not need to provide its name when accessing it via Laravel's `Storage` facade:
```php theme={null}
return Storage::get('photo.jpg');
```
### Bucket file visibility
When creating a bucket, you will be prompted to select the bucket's file visibility. All files added to the bucket will receive the specified visibility, and Laravel Cloud Object Storage buckets do not support mixing file visibility settings within a single bucket.
* **Private buckets:** all files within the bucket are private and are not publicly accessible via the Internet. However, temporary public URLs may be generated to files within these buckets using the `Storage::temporaryUrl` method [offered by Laravel](https://laravel.com/docs/filesystem#temporary-urls). These buckets are typically used for private assets like personal documents uploaded by your application's users.
* **Public buckets:** all files within the bucket are public and are publicly accessible via the Internet via a Laravel Cloud provided URL. These buckets are typically used for publicly viewable assets like user avatars.
Cloudflare R2 manages visibility at the bucket level and does not support per-object ACL headers. Do not set `visibility: 'public'` in your Flysystem storage configuration; R2 will reject the request with a `NotImplemented` error. Bucket-level visibility, set when the bucket is created, governs object access.
### Restricted file types
Laravel Object Storage buckets do not accept `.html` or `.htm` files. Any `.html` or `.htm` file uploaded to a bucket is deleted automatically. If your application needs to store `.html` files, [contact support](/docs/support) to request an exception.
### CORS policy
Laravel Cloud automatically manages CORS (Cross-Origin Resource Sharing) policies for your object storage buckets to ensure browsers will permit cross-origin requests.
#### Automatic domain inclusion
When you attach a bucket to an environment, all of the environment's custom and Cloud domains are automatically included in the bucket's CORS policy. This happens automatically without any configuration required on your part.
#### Custom allowed origins
In addition to your environment's domains, you may specify additional origins that should be allowed to access your bucket. This is particularly useful for:
* Local development environments (e.g., `http://example.test`)
* External domains that need access to your bucket
* Testing from non-production environments
To add custom allowed origins:
1. Navigate to your organization's resources page by clicking **Org > Resources > Object storage** from the main dashboard.
2. Click the "**...**" menu next to the bucket you want to configure.
3. Select "**Edit settings**".
4. In the "**Allowed origins**" field (only visible for public buckets), enter the origins you want to allow, separated by new lines.
5. Each origin must be prefixed with the protocol (`https://` or `http://`).
 #### Local development
To connect to your object storage buckets from your local Laravel application, add your local development domain (e.g., `http://example.test`) to the bucket's allowed origins. This makes it easy to test file uploads and storage operations during development.
#### Technical details
The CORS policy applied to your buckets allows the following:
* **Methods:** GET, POST, PUT, DELETE, HEAD
* **Headers:** All headers (`*`) are permitted
* **Origins:** All environment domains plus any custom origins you've configured
## Connecting to buckets
### From your application
When a bucket is attached to a Laravel or Symfony environment, Laravel Cloud automatically injects `FILESYSTEM_DISK` and AWS S3-compatible connection variables. JavaScript, Go, and Python applications receive the AWS S3-compatible variables, including `AWS_BUCKET`, `AWS_ENDPOINT_URL`, `AWS_REGION`, `AWS_ACCESS_KEY_ID`, and `AWS_SECRET_ACCESS_KEY`, when the bucket is attached as the environment's default disk. You may view these variables in your environment's General Settings.
For public buckets, `AWS_URL` (the bucket's public base URL) is shown on the bucket settings page but is not automatically injected as an environment variable. If your application references `AWS_URL`, copy the value from the bucket settings page and add it manually under your environment's custom environment variables. The AWS SDK for JavaScript (v3) also doesn't read `AWS_ENDPOINT_URL` automatically, so Next.js and Nuxt applications should pass the endpoint to their S3 client explicitly.
The injected `AWS_ENDPOINT_URL`, `AWS_REGION`, and credential variables are global AWS SDK settings rather than S3-specific ones, so every AWS SDK client in your application will pick them up. If your application also talks to other AWS services, define your own `AWS_*` environment variables — they take precedence over the injected values — and configure your bucket's S3 client explicitly.
### From your local machine
To connect to your bucket from your local machine using a Cloudflare R2 compatible bucket management client like [Cyberduck](https://cyberduck.io/):
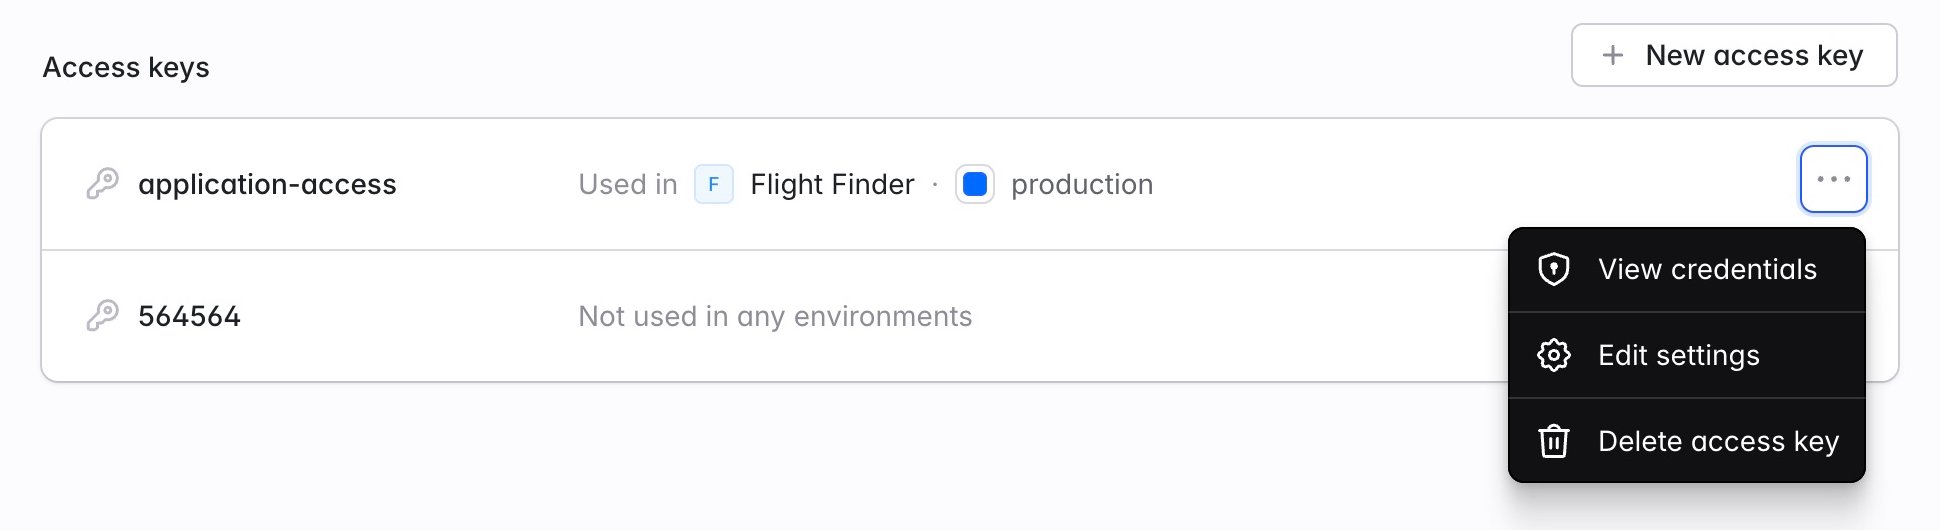
1. Navigate to **Organization > Resources > Object storage** and click your bucket. In the **Access keys** section, click **...** next to the access key you want to use, then select **View credentials**.
#### Local development
To connect to your object storage buckets from your local Laravel application, add your local development domain (e.g., `http://example.test`) to the bucket's allowed origins. This makes it easy to test file uploads and storage operations during development.
#### Technical details
The CORS policy applied to your buckets allows the following:
* **Methods:** GET, POST, PUT, DELETE, HEAD
* **Headers:** All headers (`*`) are permitted
* **Origins:** All environment domains plus any custom origins you've configured
## Connecting to buckets
### From your application
When a bucket is attached to a Laravel or Symfony environment, Laravel Cloud automatically injects `FILESYSTEM_DISK` and AWS S3-compatible connection variables. JavaScript, Go, and Python applications receive the AWS S3-compatible variables, including `AWS_BUCKET`, `AWS_ENDPOINT_URL`, `AWS_REGION`, `AWS_ACCESS_KEY_ID`, and `AWS_SECRET_ACCESS_KEY`, when the bucket is attached as the environment's default disk. You may view these variables in your environment's General Settings.
For public buckets, `AWS_URL` (the bucket's public base URL) is shown on the bucket settings page but is not automatically injected as an environment variable. If your application references `AWS_URL`, copy the value from the bucket settings page and add it manually under your environment's custom environment variables. The AWS SDK for JavaScript (v3) also doesn't read `AWS_ENDPOINT_URL` automatically, so Next.js and Nuxt applications should pass the endpoint to their S3 client explicitly.
The injected `AWS_ENDPOINT_URL`, `AWS_REGION`, and credential variables are global AWS SDK settings rather than S3-specific ones, so every AWS SDK client in your application will pick them up. If your application also talks to other AWS services, define your own `AWS_*` environment variables — they take precedence over the injected values — and configure your bucket's S3 client explicitly.
### From your local machine
To connect to your bucket from your local machine using a Cloudflare R2 compatible bucket management client like [Cyberduck](https://cyberduck.io/):
1. Navigate to **Organization > Resources > Object storage** and click your bucket. In the **Access keys** section, click **...** next to the access key you want to use, then select **View credentials**.
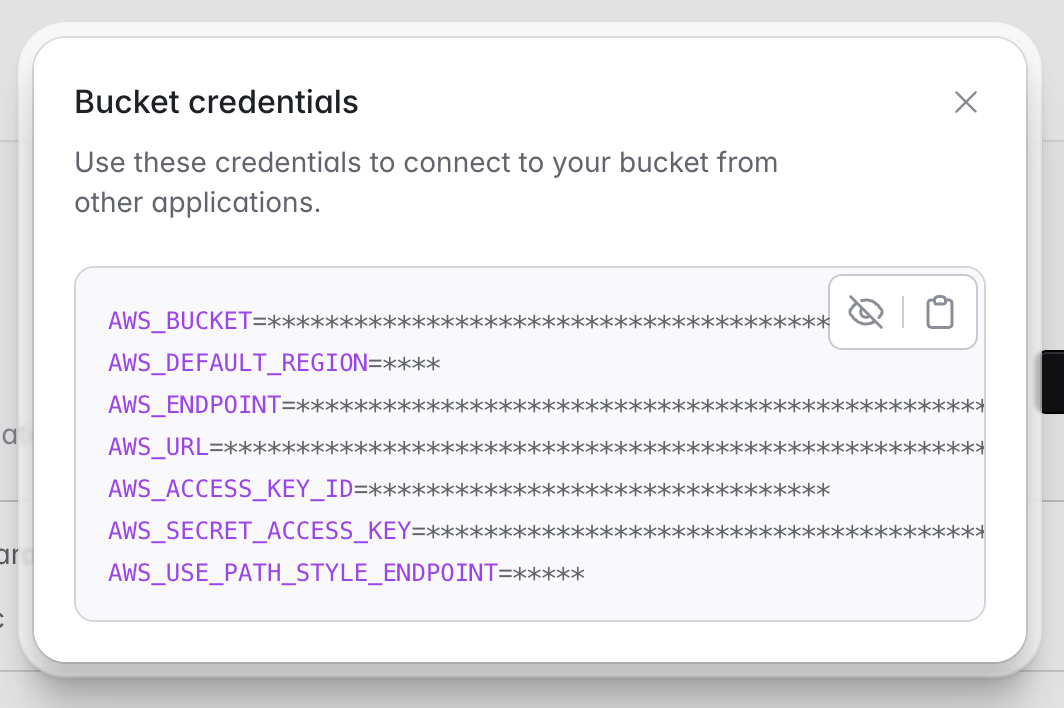
 2. The bucket credentials modal window will provide you with the name, endpoint, access key ID, and access key secret needed to connect to your bucket.
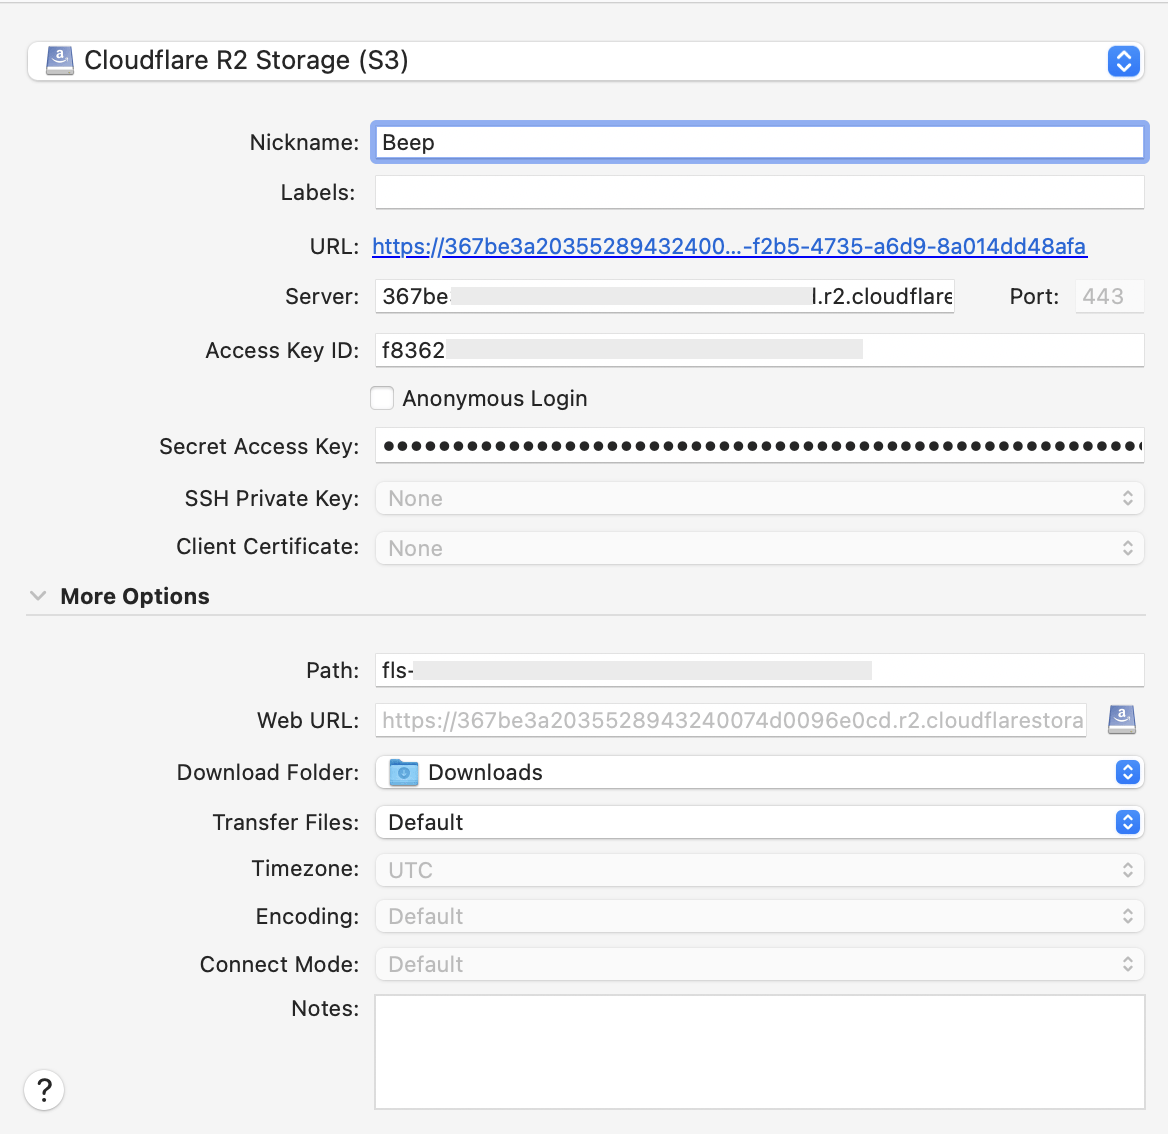
 3. When connecting to the bucket via Cyberduck:
* Open Cyberduck, select "+" in the bottom left-hand corner to create a new bookmark, and select "Cloudflare R2 Storage (S3)" as the connection type. If this is your first time using the Cloudflare R2 Storage connection, you may need to add it from `Settings > Profiles`. [Learn more](https://docs.cyberduck.io/protocols/s3/cloudflare/)
* Enter the "AWS\_ENDPOINT" bucket credentials value into the Cyberduck "Server" field
* Enter the "AWS\_ACCESS\_KEY\_ID" bucket credentials value into the Cyberduck "Access Key ID" field
* Enter the "AWS\_SECRET\_ACCESS\_KEY" bucket credentials value into the Cyberduck "Access Key Secret" field
* Enter the "AWS\_BUCKET" value into the Cyberduck "Path" field (under "More Options").
* If you do not see "More Options", you likely clicked "Open Connection" instead of creating a new bookmark from the first step.
* Optional: Give your Bookmark a "Nickname"
4. Your new Cyberduck connection should look like this when completed. You can now close the "Open connection" modal and connect to your bucket.
3. When connecting to the bucket via Cyberduck:
* Open Cyberduck, select "+" in the bottom left-hand corner to create a new bookmark, and select "Cloudflare R2 Storage (S3)" as the connection type. If this is your first time using the Cloudflare R2 Storage connection, you may need to add it from `Settings > Profiles`. [Learn more](https://docs.cyberduck.io/protocols/s3/cloudflare/)
* Enter the "AWS\_ENDPOINT" bucket credentials value into the Cyberduck "Server" field
* Enter the "AWS\_ACCESS\_KEY\_ID" bucket credentials value into the Cyberduck "Access Key ID" field
* Enter the "AWS\_SECRET\_ACCESS\_KEY" bucket credentials value into the Cyberduck "Access Key Secret" field
* Enter the "AWS\_BUCKET" value into the Cyberduck "Path" field (under "More Options").
* If you do not see "More Options", you likely clicked "Open Connection" instead of creating a new bookmark from the first step.
* Optional: Give your Bookmark a "Nickname"
4. Your new Cyberduck connection should look like this when completed. You can now close the "Open connection" modal and connect to your bucket.
 ## Editing buckets
You may edit Laravel Object Storage buckets from your organization's **Resources** page. Navigate to the **Object storage** tab and click the **...** icon for the bucket you would like to edit. Then, click **Edit settings**.
## Monitoring bucket metrics
To view your bucket's metrics, navigate to **Organization > Resources > Object storage**, click your bucket, and review the **Metrics** section. Use the time range selector to adjust the period shown. You can also view metrics for attached buckets from your environment's **Metrics** tab.
You can monitor the following for each bucket:
* **Operations:** Class A and Class B operation counts. See [Object Storage pricing](/docs/pricing#laravel-object-storage) for the operations included in each class.
* **Egress:** The amount of data transferred out of the bucket.
* **Errors:** Aggregate statistics on 4XX and 5XX responses served by R2.
## Deleting buckets
You may delete a Laravel Object Storage bucket from your organization's **Resources** page. Navigate to the **Object storage** tab and click the **...** icon for the bucket you would like to delete. Then, click **Delete bucket**.
## Editing buckets
You may edit Laravel Object Storage buckets from your organization's **Resources** page. Navigate to the **Object storage** tab and click the **...** icon for the bucket you would like to edit. Then, click **Edit settings**.
## Monitoring bucket metrics
To view your bucket's metrics, navigate to **Organization > Resources > Object storage**, click your bucket, and review the **Metrics** section. Use the time range selector to adjust the period shown. You can also view metrics for attached buckets from your environment's **Metrics** tab.
You can monitor the following for each bucket:
* **Operations:** Class A and Class B operation counts. See [Object Storage pricing](/docs/pricing#laravel-object-storage) for the operations included in each class.
* **Egress:** The amount of data transferred out of the bucket.
* **Errors:** Aggregate statistics on 4XX and 5XX responses served by R2.
## Deleting buckets
You may delete a Laravel Object Storage bucket from your organization's **Resources** page. Navigate to the **Object storage** tab and click the **...** icon for the bucket you would like to delete. Then, click **Delete bucket**.