> ## Documentation Index
> Fetch the complete documentation index at: https://cloud.laravel.com/docs/llms.txt
> Use this file to discover all available pages before exploring further.
# Laravel Cloud WebSockets
> Fully managed WebSocket clusters.
## Introduction
Laravel Cloud offers a fully managed WebSocket infrastructure powered by [Laravel Reverb](https://laravel.com/docs/reverb) clusters. Laravel Reverb is a Pusher-compatible WebSocket server that supports private channels, presence channels, client events, and more.
Laravel and Symfony applications can connect to Reverb out of the box, and you may use [Pusher's SDKs](/docs/resources/websockets/pusher) to connect from PHP, JavaScript, Python, Go, Ruby, and Java applications.
You can create Laravel Reverb powered WebSocket clusters directly from the Laravel Cloud dashboard (no external accounts needed) and attach them to your application's environments.
## Laravel Reverb
[Laravel Reverb](https://reverb.laravel.com/) is the open source, high-performance WebSocket server that powers Laravel Cloud's WebSocket clusters. Because Reverb speaks the Pusher protocol, it can provide features like private and presence channels to any application with a Pusher-compatible client.
When running managed Laravel Reverb on Laravel Cloud, Reverb clusters are automatically provisioned and fully managed for you, allowing you to avoid the time, complexity, and DevOps expertise typically required to set up and maintain a scalable and high-availability WebSocket server manually.
See the [pricing docs](/docs/pricing#laravel-reverb) for details on concurrent connections, limitations, and pricing.
### Creating clusters
To create a Laravel Reverb powered WebSocket cluster, go to your organization's **Resources** page, click the **WebSockets** tab, then click **+ New WebSocket cluster**. Laravel Cloud will prompt you to select a region and the maximum number of concurrent connections your cluster needs to be able to handle.
Laravel Cloud will automatically create a default WebSocket application for you called `main`. To attach it to an environment, go to your application canvas and click **Add resource > WebSockets**. WebSocket applications allow you to segment and share your cluster capacity across multiple applications and environments.
Once the WebSocket application has been attached to the environment, redeploy your application for the changes to take effect.
### Connecting your application
Ensure your application has Laravel Reverb and Laravel Echo installed:
```sh theme={null}
composer require laravel/reverb
npm install --save-dev laravel-echo pusher-js
```
Laravel Cloud automatically injects the Reverb environment variables needed by your application, including the frontend variables required by the [Laravel Echo](https://laravel.com/docs/12.x/broadcasting#client-side-installation) JavaScript client. No manual configuration is required.
```dotenv theme={null}
REVERB_APP_ID=10001
REVERB_APP_KEY=********
REVERB_APP_SECRET=********
REVERB_HOST=ws-********-reverb.laravel.cloud
REVERB_PORT=443
REVERB_SCHEME=https
REVERB_VERIFY_SSL=true
VITE_APP_NAME="${APP_NAME}"
VITE_REVERB_APP_KEY="${REVERB_APP_KEY}"
VITE_REVERB_HOST="${REVERB_HOST}"
VITE_REVERB_PORT="${REVERB_PORT}"
VITE_REVERB_SCHEME="${REVERB_SCHEME}"
```
Laravel Cloud's WebSocket clusters use the Pusher protocol, which is compatible with any Pusher-protocol client library. Ensure your application has the required packages installed:
```sh theme={null}
composer require pusher/pusher-php-server
npm install pusher-js
```
Laravel Cloud automatically injects the Reverb environment variables when a WebSocket application is attached to your environment:
```dotenv theme={null}
REVERB_APP_ID=10001
REVERB_APP_KEY=********
REVERB_APP_SECRET=********
REVERB_HOST=ws-********-reverb.laravel.cloud
REVERB_PORT=443
REVERB_SCHEME=https
REVERB_VERIFY_SSL=true
```
Register the Pusher client as a service in `config/services.yaml`, wiring the injected environment variables to the SDK:
```yaml theme={null}
# config/services.yaml
services:
Pusher\Pusher:
arguments:
$auth_key: '%env(REVERB_APP_KEY)%'
$secret: '%env(REVERB_APP_SECRET)%'
$app_id: '%env(REVERB_APP_ID)%'
$options:
host: '%env(REVERB_HOST)%'
port: '%env(int:REVERB_PORT)%'
scheme: '%env(REVERB_SCHEME)%'
useTLS: true
verify: '%env(bool:REVERB_VERIFY_SSL)%'
```
You can then inject `Pusher\Pusher` into any service or controller via autowiring.
`REVERB_APP_KEY` and `REVERB_HOST` are safe to expose to the browser (for example, rendered into your frontend templates for the JS client). `REVERB_APP_SECRET` is used for server-side authentication only and should never be exposed publicly.
Laravel Cloud automatically allows origins from attached environments. If your frontend is hosted elsewhere, add its URL (for example, `https://frontend.example.com`) to the WebSocket application's **Allowed origins**.
Ensure your application has Pusher's [Node.js HTTP SDK](https://github.com/pusher/pusher-http-node) installed:
```sh theme={null}
npm install pusher
```
Laravel Cloud automatically injects the following variables when a WebSocket application is attached to your environment:
```dotenv theme={null}
PUSHER_APP_ID=10001
PUSHER_APP_KEY=********
PUSHER_APP_SECRET=********
PUSHER_HOST=ws-********-reverb.laravel.cloud
PUSHER_PORT=443
PUSHER_SCHEME=https
```
Then, create a Pusher client using the injected variables:
```javascript theme={null}
const Pusher = require('pusher');
const pusher = new Pusher({
appId: process.env.PUSHER_APP_ID,
key: process.env.PUSHER_APP_KEY,
secret: process.env.PUSHER_APP_SECRET,
host: process.env.PUSHER_HOST,
port: process.env.PUSHER_PORT,
useTLS: process.env.PUSHER_SCHEME === 'https',
});
```
For complete examples of publishing and receiving events, check out the [Pusher SDKs documentation](/docs/resources/websockets/pusher#node-js).
Ensure your application has Pusher's [Python HTTP SDK](https://github.com/pusher/pusher-http-python) installed:
```sh theme={null}
pip install pusher
```
Laravel Cloud automatically injects the following variables when a WebSocket application is attached to your environment:
```dotenv theme={null}
PUSHER_APP_ID=10001
PUSHER_APP_KEY=********
PUSHER_APP_SECRET=********
PUSHER_HOST=ws-********-reverb.laravel.cloud
PUSHER_PORT=443
PUSHER_SCHEME=https
```
Then, create a Pusher client using the injected variables:
```python theme={null}
import os
import pusher
client = pusher.Pusher(
app_id=os.environ["PUSHER_APP_ID"],
key=os.environ["PUSHER_APP_KEY"],
secret=os.environ["PUSHER_APP_SECRET"],
host=os.environ["PUSHER_HOST"],
port=int(os.environ["PUSHER_PORT"]),
ssl=os.environ["PUSHER_SCHEME"] == "https",
)
```
For complete examples of publishing and receiving events, check out the [Pusher SDKs documentation](/docs/resources/websockets/pusher#python).
Ensure your application has Pusher's [Go HTTP SDK](https://github.com/pusher/pusher-http-go) installed:
```sh theme={null}
go get github.com/pusher/pusher-http-go/v5
```
Laravel Cloud automatically injects the following variables when a WebSocket application is attached to your environment:
```dotenv theme={null}
PUSHER_APP_ID=10001
PUSHER_APP_KEY=********
PUSHER_APP_SECRET=********
PUSHER_HOST=ws-********-reverb.laravel.cloud
PUSHER_PORT=443
PUSHER_SCHEME=https
```
Then, create a Pusher client using the injected variables. The Go SDK expects the port to be included in its `Host` field:
```go theme={null}
client := pusher.Client{
AppID: os.Getenv("PUSHER_APP_ID"),
Key: os.Getenv("PUSHER_APP_KEY"),
Secret: os.Getenv("PUSHER_APP_SECRET"),
Host: net.JoinHostPort(os.Getenv("PUSHER_HOST"), os.Getenv("PUSHER_PORT")),
Secure: os.Getenv("PUSHER_SCHEME") == "https",
}
```
For complete examples of publishing and receiving events, check out the [Pusher SDKs documentation](/docs/resources/websockets/pusher#go).
Ensure your application's `Gemfile` includes Pusher's [Ruby HTTP SDK](https://github.com/pusher/pusher-http-ruby), then run `bundle install`:
```ruby theme={null}
gem "pusher"
```
Laravel Cloud automatically injects the following variables when a WebSocket application is attached to your environment:
```dotenv theme={null}
PUSHER_APP_ID=10001
PUSHER_APP_KEY=********
PUSHER_APP_SECRET=********
PUSHER_HOST=ws-********-reverb.laravel.cloud
PUSHER_PORT=443
PUSHER_SCHEME=https
```
Then, create a Pusher client using the injected variables:
```ruby theme={null}
require "pusher"
client = Pusher::Client.new(
app_id: ENV.fetch("PUSHER_APP_ID"),
key: ENV.fetch("PUSHER_APP_KEY"),
secret: ENV.fetch("PUSHER_APP_SECRET"),
host: ENV.fetch("PUSHER_HOST"),
port: Integer(ENV.fetch("PUSHER_PORT")),
use_tls: ENV.fetch("PUSHER_SCHEME") == "https"
)
```
For complete examples of publishing and receiving events, check out the [Pusher SDKs documentation](/docs/resources/websockets/pusher#ruby).
Laravel Cloud automatically injects the following variables into Java applications, as well as PHP applications that don't use Laravel or Symfony:
```dotenv theme={null}
PUSHER_APP_ID=10001
PUSHER_APP_KEY=********
PUSHER_APP_SECRET=********
PUSHER_HOST=ws-********-reverb.laravel.cloud
PUSHER_PORT=443
PUSHER_SCHEME=https
```
You may then use Pusher's HTTP SDKs to publish events from your server and its WebSocket SDKs to receive them. For examples in each language, check out the [Pusher SDKs documentation](/docs/resources/websockets/pusher).
### Editing, resizing, and splitting clusters
You can edit and resize your WebSocket cluster from your organization's **Resources** page. Go to **WebSocket clusters** and click the **...** icon on your cluster, then click **Edit settings**.
You can use a single WebSocket cluster across multiple applications by splitting the maximum concurrent connections you have provisioned to your cluster across multiple WebSocket applications.
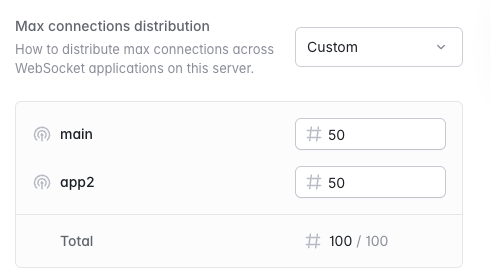 You can choose an even distribution or manually configure a custom split.
### Metrics
To view your WebSocket metrics, such as connection count and message rate, navigate to **Organization > Resources > WebSockets**, click your Reverb cluster, and review the **Metrics** section. You can also select **... > View metrics** on the cluster card to jump directly to this section.
Use the application selector in the **Metrics** section to view **All applications** or an individual application. Use the time range selector to adjust the period shown.
### Detaching applications
If a WebSocket cluster is no longer needed by your application, you can detach it from your application canvas.
You can choose an even distribution or manually configure a custom split.
### Metrics
To view your WebSocket metrics, such as connection count and message rate, navigate to **Organization > Resources > WebSockets**, click your Reverb cluster, and review the **Metrics** section. You can also select **... > View metrics** on the cluster card to jump directly to this section.
Use the application selector in the **Metrics** section to view **All applications** or an individual application. Use the time range selector to adjust the period shown.
### Detaching applications
If a WebSocket cluster is no longer needed by your application, you can detach it from your application canvas.
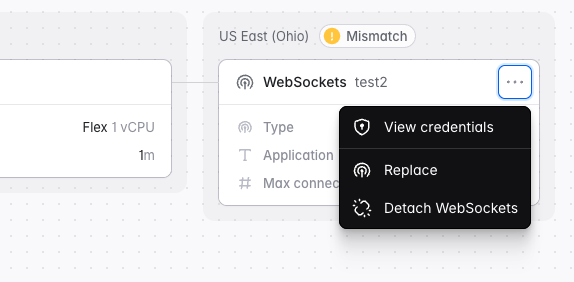 Detaching a WebSocket application from an environment does not delete the cluster or stop it from accruing usage charges.
### Deleting clusters
You may delete a WebSocket cluster from your organization's **Resources** page. Navigate to the **WebSockets** tab and click the **...** icon for the cluster you would like to delete. Then, click **Delete cluster**.
## Other WebSocket providers
If you don't want to use Laravel Reverb powered WebSocket clusters, you can pair Laravel Cloud with an external WebSocket provider like Pusher or Ably. Both are compatible with Laravel event broadcasting and Laravel Echo. You will, however, need to manage your WebSocket infrastructure and billing outside of Laravel Cloud and manage your environment variables manually.
Detaching a WebSocket application from an environment does not delete the cluster or stop it from accruing usage charges.
### Deleting clusters
You may delete a WebSocket cluster from your organization's **Resources** page. Navigate to the **WebSockets** tab and click the **...** icon for the cluster you would like to delete. Then, click **Delete cluster**.
## Other WebSocket providers
If you don't want to use Laravel Reverb powered WebSocket clusters, you can pair Laravel Cloud with an external WebSocket provider like Pusher or Ably. Both are compatible with Laravel event broadcasting and Laravel Echo. You will, however, need to manage your WebSocket infrastructure and billing outside of Laravel Cloud and manage your environment variables manually.